
The Elder Scrolls Online Housing Portal
Updated May 20, 2025
Quick Index:
* Free Faction-Specific Houses
- Housing Permissions Explained
* How to View Permissions for Your House
* Adding Exceptions to House Permissions: Visitors
* Adding Exceptions to House Permissions: Guild Visitors
* Adding Exceptions to House Permissions: Banlist
* Adding Exceptions to House Permissions: Guild Banlist
* Copying Permissions From Another House
* Changing Permissions You Have Already Set
- Linking Houses in Chats, Whispers, Guild MotDs, and Mails
* Link Your House While Inside Your House
* Link Your House While Anywhere in the Game
* Link Someone Else's House While Inside
* Link Anyone's House Without Entering
* Posting Links to Guild MotDs or In-Game Mails
- Home Tours (Opens New Page)
- Houseguests (Opens New Page)
"FREE" HOUSING
Did you know that you can get "Free" Houses in ESO without having to purchase them? You can! So, how does this work?
- Select a character that has not yet claimed a free house. It must be level 6 as of Update 39 to do this quest.
- Open the Crown Store and go to the Quest Starters section. Select the General sub-category to view all available quests there.
- Accept the free A Room to Spare quest on that character and complete it in that same city.
- Completion of the quest awards you the free house in that city.
For the purposes of claiming the free houses, if you cannot use an existing character you can use an empty character slot, create a temporary character on your account, and level it to 6 (required as of Update 39). You can use this temporary character to claim one single free house. Once claimed, you can delete the character and the rest of your characters will still have access to the house.
Claimed houses are account-bound. This means that if you delete the character you used to claim a house or inn room, you retain the house/inn room when the character is deleted. Even if you only had one character on your account and deleted the character, you will have access to it on the next character you create on that same account.
You cannot transfer ownership of a house to another person or account; the house is bound to one account only. If you are looking to give someone a house, you may Gift them a new one via the Crown Store.
Only certain houses can be claimed for free: Faction-Specific houses and Neutral Houses.
What if I do not wish to use a second (or third or fourth, etc.) character to claim a free house? Can I still get the other free houses for free? No. However, you can spend a mere 3,000 gold per house to purchase an unfurnished version of the other houses listed under Free Housing on this page. Simply complete any necessary requirements to unlock it, go to the house you wish to purchase, open the purchasing options, and pay the 3,000 gold to obtain the house. There are a couple of exceptions to this rule, such as houses earned via events/special promotions that have never been for sale otherwise, and the Hall of the Lunar Champion (see Neutral Houses for details).
★ Free Faction-Specific Houses
There are three houses that require your character to be of a certain faction (Daggerfall, Aldmeri, or Ebonheart) in order to claim them for free:
- Ebony Flask Inn Room, The: This is located in Ebonheart, Stonefalls. You may claim it for free with an Ebonheart Pact character or pay $3,000g to claim it on any character.
- Mara's Kiss Public House: This is located in Vulkhel Guard, Auridon. You must be on an Aldmeri Dominion character.
- Rosy Lion, The: This is located in Daggerfall, Glenumbra. You must be on a Daggerfall Covenant character.
1. To claim a room, log onto a character of the required faction that has not yet claimed an inn room for free.
2. Go to the location of the free inn room you wish to obtain and speak to Felande Demarie. You will find her standing next to the free room.
3. Accept and complete the Room to Spare quest given by Felande Demarie.
4. Completion of the Room to Spare quest rewards you with a free inn room.
You cannot accept the quest in one location and then go to another location to turn it in. This quest must be turned in at the location it was accepted from.
The housing brochure that you get can be thrown away after you turn the quest in. It serves no purpose in claiming your inn room.
★ Free Neutral Houses
Unlike the faction-specific houses, you only need a character that has not claimed a free house but has completed the Room to Spare quest. It is not necessary to use a character in a certain faction -- any character will do.
- Ancient Anchor Berth: This is located in Gonfalon Bay, High Isle. You must have the High Isle DLC.
- Golden Gryphon Garret: This is located in Shimmerene, Summerset. You must have the Summerset DLC.
- Hall of the Lunar Champion: This is located in Rimmen, Northern Elsewyer. You must have the Elsweyr DLC. Money is not paid for this house, as it is earned in-game by performing certain actions, such as completing part of the Northern Elsweyr storyline. See the page for the house for full details.
- Journey's End Lodgings: This is located in Necrom, Telvanni Peninsula. You must have the Necrom DLC.
- Pilgrim's Rest: This is located in Leyawiin, Blackwood. You must have the Blackwood DLC.
- Rosewine Retreat: This is located in Skingrad, West Weald. You must have the Gold Road DLC.
- Saint Delyn Penthouse: This is located in Vivec City, Vvardenfell.
- Sleepy Sloth, The: This is located in Sunport, Solstice. You must have the Season of the Worm Cult (2025 Content Pass) DLC.
- Snowmelt Suite: This is located in Solitude, Western Skyrim. You must have the Greymoor DLC.
- Sugar Bowl Suite: This is located in Rimmen, Northern Elsweyr. You must have the Elsweyr DLC.
HOUSE LIST
If the Availablity or Cost has an Asterisk ( * ), there are (or were) special circumstances to obtaining the house. Please click on the House name to view that information.
Note: The ID number mentioned with each house may be used in conjunction with Linking Anyone's House Without Entering.
| House | Locale | ID | Type | Availability | Unfurnished Gold Cost |
Unfurnished Crown Cost |
Furnished Crown Cost |
| Agony's Ascent | Deadlands, The | 93 | Notable | Sale | - | 14,000c | 17,500c |
| Ald Velothi Harbor House | Vvardenfell | 44 | Classic | Always | 322,000g | 4,000c | 5,000c |
| Alinor Crest Townhouse | Summerset | 59 | Classic | Always * | 1,025,000g | 6,000c | 7,500c |
| Amaya Lake Cottage | Vvardenfell | 43 | Classic | Always * | 1,300,000g | 7,000c | 8,800c |
| Ample Domicile, The | Shadowfen | 11 | Classic | Always | 195,000g | 3,520c | 4,400c |
| Ancient Anchor Berth | High Isle | 95 | Staple | Always * | Free/3,000g * | - | - |
| Antiquarian's Alpine Gallery | Western Skyrim | 81 | Classic | Sale | - | 7,000c | - |
| Autum's-Gate | Rift, The | 28 | Staple | Always | 60,000g | 2,350c | 2,900c |
| Barbed Hook Private Room | Auridon | 4 | Staple | Always | 11,000g | 600c | 800c |
| Bastion Sanguinaris | Western Skyrim | 79 | Notable | Sale | - | 14,000c | 17,500c |
| Bismuth Steam Baths | Solstice | 117 | Classic | Always | 1,200,000 | 7,200c | 9,000c |
| Black Vine Villa | Malabal Tor | 7 | Staple | Always | 54,000g | 2,250c | 2,800c |
| Bouldertree Refuge | Greenshade | 14 | Classic | Always | 190,000g | 3,500c | 4,400c |
| Captain Margaux's Place | Glenumbra | 16 | Staple | Always | 56,000g | 2,600c | 2,900c |
| Castle Skingrad | West Weald | 116 | Notable | Sale | n/a | 14,000c | 17,500c |
| Cliffshade | Greenshade | 8 | Classic | Always | 255,000g | 3,600c | 4,500c |
| Coldharbour Surreal Estate | Coldharbour | 47 | Notable | Always * | 1,000,000g | 5,600c | - |
| Colossal Aldmeri Grotto | Summerset | 60 | Notable | Sale | - | 15,000c | 18,750c |
| Cyrodilic Jungle House | Malabal Tor | 25 | Staple | Always | 71,000g | 2,550c | 3,200c |
| Daggerfall Overlook | Glenumbra | 38 | Notable | Always * | 3,780,000g | 11,000c | 13,800c |
| Dawnshadow | Reaper's March | 24 | Classic | Always * | 1,275,000g | 6,200c | 7,800c |
| Domus Phrasticus | Craglorn | 26 | Classic | Always | 295,000g | 4,000c | 5,000c |
| Doomchar Plateau | Malabal Tor | 90 | Notable | None * | - | - | - |
| Earthtear Cavern | Craglorn | 41 | Notable | Always | - | 13,000c | 16,300c |
| Ebonheart Chateau | Stonefalls | 39 | Notable | Always * | 3,785,000g | 12,000c | 15,000c |
| Ebony Flask Inn Room, The | Stonefalls | 3 | Staple | Always * | Free/3,000g | - | - |
| Elinhir Private Arena | Craglorn | 66 | Notable | Sale | - | 9,600c | 12,000c |
| Emissary's Enclave | Telvanni Peninsula | 101 | Classic | Always * | 1,300,000g | 7,000c | 8,000c |
| Enchanted Snow Globe Home | Eastmarch | 63 | Classic | Sale * | - | 4,200c | 5,250c |
| Erstwhile Sanctuary, The | Gold Coast | 56 | Notable | Sale | - | 13,000c | 16,250c |
| Exorcised Coven Cottage | Glenumbra | 49 | Classic | Sale * | 250,000g | 3,500c | 4,400c |
| The Fair Winds | Galen | 99 | Notable | - | Sale | 14,000c | 17,500 |
| Flaming Nix Deluxe Garret | Deshaan | 6 | Staple | Always | 13,000g | 600c | 800c |
| Fogbreak Lighthouse | High Isle | 98 | Notable | Sale | n/a | 11,000c | 13,750c |
| Forgemaster Falls | Wrothgar | 75 | Classic | Sale | - | 6,200c | 7,800c |
| Forsaken Stronghold | Bangkorai | 33 | Classic | Always * | 1,285,000g | 6,400c | 8,000c |
| Frostvault Chasm | Eastmarch | 65 | Classic | Sale | - | 4,400c | 5,500c |
| Gardner House | Stormhaven | 18 | Classic | Always * | 1,015,000g | 5,700c | 7,100c |
| Gladesong Arboretum | Galen | 105 | Notable | Sale | - | 11,000c | 13,750c |
| Golden Gryphon Garret | Summerset | 58 | Staple | Always * | 3,000g | - | - |
| Gorinir Estate, The | Grahtwood | 15 | Classic | Always * | 780,000g | 5,600c | 7,000c |
| Grand Gallery of Tamriel | Rift, The | 114 | Notable | Free * | - | - | - |
| Grand Psijic Villa | Summerset | 62 | Notable | Sale | - | 14,000c | 17,500c |
| Grand Topal Hideaway | Grahtwood | 40 | Notable | Sale | - | 15,000c | 18,800c |
| Grymharth's Woe | Eastmarch | 29 | Classic | Always | 280,000g | 3,800c | 4,800c |
| Hakkvild's High Hall | Craglorn | 48 | Notable | Always * | 3,800,000g | 12,000c | 15,000c |
| Hall of the Lunar Champion | Northern Elsweyr | 70 | Notable | Always * | Free * | - | - |
| Hammerdeath Bungalow | Stormhaven | 31 | Staple | Always | 65,000g | 2,400c | 3,000c |
| Haven of the Five Companions | West Weald | 112 | Classic | None * | Free * | - | - |
| Highhallow Hold | High Isle | 96 | Notable | Sale | - | 10,000c | 12,500c |
| House of the Silent Magnifico | Alik'r Desert | 35 | Classic | Always | 320,000g | 4,100c | 5,100c |
| Humblemud | Bal Foyen | 10 | Staple | Always | 40,000g | 2,100c | 2,600c |
| Hunding's Palatial Hall | Stros M'Kai | 36 | Classic | Always * | 1,295,000g | 6,500g | 8,100g |
| Hunter's Glade | Rift, The | 61 | Notable | Sale | - | 8,000c | 10,000c |
| Journey's End Lodgings | Telvanni Peninsula | 100 | Staple | Always * | 3,000g | - | - |
| Jode's Embrace | Northern Elsweyr | 69 | Notable | Sale | - | 14,000c | 17,500c |
| Kelesan'Ruhn | Telvanni Peninsula | 104 | Classic | None * | - | - | - |
| Kragenhome | Stonefalls | 19 | Staple | Always | 69,000g | 2,500c | 3,100c |
| Kthendral Deep Mines | Western Skyrim | 113 | Notable | Sale | - | 13,000c | 16,000c |
| Kushalit Sanctuary | Vvardenfell | 85 | Notable | Sale | - | 13,000c | 16,250c |
| Lakemire Xanmeer Manor | Murkmire | 64 | Notable | Sale | - | 14,000c | 17,500c |
| Linchal Grand Manor | Gold Coast | 46 | Notable | Sale | - | 14,000c | 17,500c |
| Lucky Cat Landing | Southern Elsweyr | 73 | Classic | Always | - | 4,400c | 5,500c |
| Mara's Kiss Public House | Auridon | 1 | Staple | Always * | 3,000g | - | - |
| Mathiisen Manor | Auridon | 9 | Classic | Always * | 1,025,000g | 6,000c | 7,500c |
| Merryvine Estate | West Weald | 110 | Classic | Always * | 1,300,000g | 7,000c | 8,500c |
| Moon-Sugar Meadow | Northern Elsweyr | 71 | Notable | Always | - | 6,400c | - |
| Moonmirth House | Khenarthi's Roost | 22 | Staple | Always | 50,000g | 2,200c | 2,800c |
| Mournoth Keep | Bangkorai | 32 | Classic | Always | 325,000g | 4,300c | 5,400c |
| Observatory Prior, The | Clockwork City | 55 | Notable | Always | - | 12,000c | 15,000c |
| Old Mistveil Manor | Rift, The | 30 | Classic | Always * | 1,020,000g | 5,800c | 7,300c |
| Ossa Accentium | Fargrave | 92 | Notable | Sale | - | 10,000c | 12,500c |
| Pantherfang Chapel | Blackwood | 89 | Notable | Sale | - | 14,000c | 17,500c |
| Pariah's Pinnacle | Wrothgar | 54 | Notable | Sale | - | 13,000c | 16,250c |
| Pilgrim's Rest | Blackwood | 87 | Staple | Always * | 3,000g | - | - |
| Potentate's Retreat | Southern Elseweyr | 74 | Notable | Sale | - | 13,000c | 16,250c |
| Princely Dawnlight Palace | Hew's Bane | 57 | Notable | Sale | - | 14,000c | 17,500c |
| Proudspire Manor | Western Skyrim | 78 | Classic | Always * | 1,050,000g | 6,000c | 7,500c |
| Quondam Indorilia | Deshaan | 21 | Classic | Always * | 1,265,000g | 6,100c | 7,600c |
| Ravenhurst | Rivenspire | 17 | Classic | Always | 260,000g | 3,500c | 4,400c |
| Rosewine Retreat | West Weald | 109 | Staple | Always * | 3,000g | - | - |
| Rosy Lion, The | Glenumbra | 2 | Staple | Always * | Free | - | - |
| Saint Delyn Penthouse | Vvardenfell | 42 | Staple | Always * | 3,000g | - | - |
| Seaveil Spire | Betnikh | 94 | Notable | Sale | - | 14,000c | 17,500c |
| Seabloom Villa | Auridon | 111 | Classic | DLC* | - | - | - |
| Serenity Falls Estate | Reaper's March | 37 | Notable | Always * | 3,775,000g | 10,000c | 12,500c |
| Shadow Queen's Labyrinth | Clockwork City | 102 | Notable | Sale | - | 13,000c | 16,250c |
| Shalidor's Shrouded Realm | Western Skyrim | 82 | Notable | Sale | - | 13,000c | 16,250c |
| Shattered Mirror Isle | West Weald | 115 | Notable | Always | Unknown | Unknown | Unknown |
| Sisters of the Sands Apartment | Alik'r Desert | 5 | Staple | Always | 12,000g | 640c | 800c |
| Sleek Creek House | Reaper's March | 23 | Classic | Always | 335,000g | 4,400c | 5,500c |
| Sleepy Sloth, The | Solstice | Unknown | Staple | Always | Free * | - | - |
| Snowmelt Suite | Western Skyrim | 77 | Staple | Always * | 3,000g | - | - |
| Snugpod | Grahtwood | 13 | Staple | Always | 45,000g | 2,150c | 2,700c |
| Stay-Moist Mansion | Shadowfen | 12 | Classic | Always * | 760,000g | 5,500c | 6,900c |
| Stillwaters Retreat | Western Skyrim | 80 | Notable | Always | - | 7,000 | - |
| Stone Eagle Aerie | Reach, The | 83 | Notable | Sale | - | 12,000c | 15,000c |
| Strident Springs Demesne | Reaper's March | 27 | Classic | Always * | 1,280,000g | 6,300c | 7,900c |
| Sugar Bowl Suite | Northern Elsweyr | 68 | Staple | Always * | 3,000g | - | - |
| Sweetwater Cascades | Blackwood | 91 | Notable | Sale | - | 13,000c | 16,250c |
| Sword-Singer's Redoubt | Alik'r Desert | 103 | Notable | None | Free * | None | None |
| Tel Galen | Vvardenfell | 45 | Notable | Sale | - | 8,000c | 10,000c |
| Theater of the Ancestors | Blackwood | Unknown | Notable | Unknown | - | Unknown | Unknown |
| Thieves' Oasis | Bangkorai | 76 | Notable | Sale | - | 13,000c | 16,250c |
| Tower of Unutterable Truths | Apocrypha | 106 | Notable | Sale | - | 13,000c | 16,250c |
| Twin Arches | Bangkorai | 34 | Staple | Always | 73,000g | 2,600c | 3,300c |
| Varlaisvea Ayleid Ruins | Gold Coast | 86 | Notable | Sale | - | 12,000c | 15,000c |
| Velothi Reverie | Deshaan | 20 | Classic | Always | 323,000g | 4,200c | 5,300c |
| Water's Edge | Blackwood | 88 | Classic | Always * | 1,050,000g | 6,200c | 7,800c |
| Wraithhome | Rivenspire | 72 | Notable | Sale | - | 14,000c | 17,500c |
| Willowpond Haven | Blackwood | 107 | Notable | Sale | - | 13,000c | 16,250c |
| Zhan Khaj Crest | Southern Elsweyr | 108 | Notable | Sale | - | 12,000c | 15,000c |
HOUSING PERMISSIONS EXPLAINED
★ How to View House Permissions for Your House
The permissions system for Housing in ESO is fairly versatile. In fact, you are able to set Permissions on each individual house! So, if you have the Cliffshade and Gardner houses, you can actually set them with completely different permissions if you like. Yes! You really can!
First, however, we are going to back up and start with the basics: How to actually see the current permissions set on your house so that you can change them or leave them at will.
Note 1: You cannot view the permissions on a house you do not own.
Note 2: Permissions that you set in one house pertain only to that house unless you Copy Permissions of a house (explained later).
- You need to be inside the house at which you wish to see the permissions. Head there now!
- Use the assigned keybinding to open the Housing Editor (named Show Housing Panel in your list of controls). The default keybind for keyboard and mouse users is 'F5'.
- Press the assigned keybinding to Browse. The default keybind for keyboard and mouse users is 'R'.
- On the right side of your screen, a Housing box will appear. At the top right of that box are several tabs, represented by icons (images). Click the Settings tab, which looks like two gears.
- Here you have Six categories:

- General - General house permissions
- Occupants - The character names of anyone in your house at that time.
- Visitors - Where you set special permissions for individual accounts
- Banlist - Where you set bans on individual accounts
- Guild Visitors - Where you set special permissions for entire guilds
- Guild Banlist - Where you set bans on current members of entire guilds
- General - General house permissions
- For the time being, please select the "General" category. For each of the additional categories mentioned further below, this is how you get to them.
The General cateory of your House Settings window is where you are going to find the basic permissions for your house.
Primary Residence - This setting allows you to make the house you are standing in your Primary Residence. A person that has you in a Friends List or Guild List can right-click on your username and select 'Visit Primary Residence'. If the house is "open" ("open" is explained below), that person will be teleported into the house you marked as a Primary Residence. Hence the phrase that is sometimes asked, "Is the house your Primary?"
- If the house is not already marked as your Primary House, you will have an option here to 'Make Primary Residence' that you can click.
- If the house is already marked as your Primary House, the 'Make Primary Residence' option is grayed out.
Default Visitor Access - This setting is the default for All Visitors to your house. This setting can be overridden by specific permissions set within the Visitors, Banlist, Guild Visitors, and Guild Banlist categories mentioned above. More about that is covered under Adding Exceptions to House Permissions.
- No Access: This prevents Everyone from entering your house Except special permissions set in your Visitors and Guild Visitors categories. This is how you can "lock your house" if you prefer to while building, etc.
- Limited Visitor: Players can visit the house. They cannot turn lights on/off. They cannot use Crafting Stations. They cannot use furnishings you place into the house that have prompts to use them (open/close extra doors, use levers, etc.). However, if the property came with a door leading into a home on it, the visitor can still use that particular door. For example, the Cyrodilic Jungle House has one single door in it that leads into a house. Visitors would be able to use this door. However, if you placed a 'Markarth Door, Double' furnishing into the house as well, the visitor would not be able to use it.
- Visitor: Players can visit the house. They can interact with all lights, use crafting stations, and use interactable furnishings that you place into the house (such as doors and levers).
- Decorator: Players can visit the house and move your furniture around. They can interact with all lights, use crafting stations, and use all interactable furnishings that you place into the house. They cannot remove furniture from the house and place it into their inventories.
Restart All Paths - This particular setting pertains to Houseguests that you have placed into your house.
- If you have placed a Houseguest in your house and have set a Path for it to walk, clicking the 'Restart Paths' links here will put all Houseguests at the very start of their pathing.
- This setting is extremely helpful if you are trying to coordinate the pathing of one houseguest with another, making it easier for them to do things like cross paths without moving through each other.
- This setting is also helpful if you are testing the pathing of a houseguest to ensure that it is not, for example, walking through rocks and walls.
★ Adding Exceptions to House Permissions: Visitors
The Visitors category in your house permissions screen is used to give specific accounts permissions for a particular house. If the permissions you wish to give the individual match the general permissions of the house, you do not need to add an exception for that person. However, if the permissions you wish to give the individual differ from the general house permissions, this category is exactly where you add that account name.
To set individual permissions for an account, you need to first View House Permissions and select the Visitor category.
If you have no special permissions set, the Visitors category tells you that "You don't have any entries in this list.".
Any people that you give access to will be listed in this panel on the right side, along with individual permissions you set to those people.
Any exceptions that you add will, of course, only apply that individual house, or to houses that you later Copy Permissions to.
If you add the name of someone's account to the Visitors panel but they are a part of a guild to which you have also given permissions, all permissions set to the individual account in the Visitors panel will supercede the permissions in the Guild Visitors panel. For example, @Buddy is part of the XYZ guild. You have already given the XYZ guild permissions for Limited Visitor. However, @Buddy is your best friend and you want him to have more access. You add @Buddy to the Visitor permissions panel and set his permissions to Decorator. Now, any time someone in XYZ guild comes in, they will have only Limited Visitor permissions -- except @Buddy. @Buddy will be able to decorate your house.
If you wish to Make Changes to Permissions for guild visitors, it is in this panel that you should do so.
At the bottom of your screen you will have at least two options: Add Player and Load Permissions.
Add Player is used to add an account to the Visitors list for that specific house.
- Use the assigned keybinding to Add Player to the visitor list. The default keybinding is 'R'. An Add Visitor box appears.
- In the 'Enter character name or UserID' field, enter either the name of the character or the person's account name. Entering either of these will set permissions for any character on the other player's account.
- In the Permissions box, choose the specific permissions setting that will apply to that other player. These permissions are almost identical to the ones covered under How to View House Permissions for Your House: Limited Visitor, Visitor, and Decorator. Only 'No Access' is left out, as that is covered under Banlist.
- There is a checkmark box under the Permissions box that reads, "Apply to all Houses" By default, this box is checkmarked. If you wish these settings to apply only to this house, be certain to Uncheck that box.
- Confirm your settings using the appropriate keybinding (default: 'E').
Load Permissions is covered under Copying Permissions From Another House in order to avoid monotonous repetition and to save space.
★ Adding Exceptions to House Permissions: Guild Visitors
The Guild Visitors permissions allow you to 'open' a specific house to members of an entire guild, while remaining closed to anyone not in that guild or on an exception list. If the permissions you wish to give the guild match the general permissions of the house, you do not need to add an exception for that guild. However, if the permissions you wish to give the guild differ from the general house permissions, this category is exactly where you add the guild's name.
To set guild permissions for a house, you need to first View House Permissions and select the Guild Visitors category.
If you have no special permissions set, the Guild Visitors category tells you that "You don't have any entries in this list.".
Any guilds that you give access to will be listed in this panel on the right side, along with the guild-wide permissions you set to those guild members.
Any exceptions that you add will, of course, only apply that individual house, or to houses that you later Copy Permissions to.
If you add the name of a guild to the Guild Visitors but you also have a member of that guild in your Visitors permissions panel, all permissions set to the individual account on the Visitors panel will supercede the permissions in the Guild Visitors panel. For example, @Buddy is part of the XYZ guild. You have already given the XYZ guild permissions for Limited Visitor. However, @Buddy is your best friend and you want him to have more access. You add @Buddy to the Visitor permissions panel and set his permissions to Decorator. Now, any time someone in XYZ guild comes in, they will have only Limited Visitor permissions -- except @Buddy. @Buddy will be able to decorate your house.
If you wish to Make Changes to Permissions for guild visitors, it is in this panel that you should do so.
At the bottom of your screen you will have at least two options: Add Guild and Load Permissions.
Add Guild is used to add the name of a guild to the Guild Visitors list for that specific house.
- Use the assigned keybinding to Add Guild to the guild visitors list. The default keybinding is 'R'. An Add Visitor box appears.
- In the 'Enter guild name' field, enter the name of the guild.
- In the Permissions box, choose the specific permissions setting that will apply to all members of that guild. These permissions are almost identical to the ones covered under How to View House Permissions for Your House: Limited Visitor, Visitor, and Decorator. Only 'No Access' is left out, as that is covered under Banlist.
- There is a checkmark box under the Permissions box that reads, "Apply to all Houses" By default, this box is checkmarked. If you wish these settings to apply only to this house, be certain to Uncheck that box.
- Confirm your settings using the appropriate keybinding (default: 'E').
Load Permissions is covered under Copying Permissions From Another House in order to avoid monotonous repetition and to save space.
★ Adding Exceptions to House Permissions: Banlist
The Banlist category in your house permissions screen is used to deny specific accounts access to a particular house. To deny a specific account access, you need to first View House Permissions and select the Banlist category.
This panel will give you two options at the bottom of your screen: Add Player and Load Permissions.
If you have not banned anyone from entering, the Banlist category tells you that "You don't have any entries in this list.".
Any individual accounts that you ban from that house will be listed in this panel on the right side, with an 'X' to the left of the name. Clicking that 'X' will remove the name from your banlist.
You may also Copy Permissions to add individual accounts to your banlist.
The Banlist will supercede all other permissions you have set for that particular house. Should an account on your Banlist be in a guild with you, and you have added that guild to your Guild Visitors list, that account on the banlist will still be unable to enter.
Load Permissions is covered under Copying Permissions From Another House in order to avoid monotonous repetition and to save space.
★ Adding Exceptions to House Permissions: Guild Banlist
The Guild Banlist category in your house permissions screen is used to deny specific guilds access to a particular house. To deny a specific guild access, you need to first View House Permissions and select the Guild Banlist category.
This panel will give you two options at the bottom of your screen: Add Guild and Load Permissions.
If you have not banned a guild from entering, the Guild Banlist category tells you that "You don't have any entries in this list.".
Any guilds that you ban from that house will be listed in this panel on the right side, with an 'X' to the left of the name. Clicking that 'X' will remove the name from your banlist.
You may also Copy Permissions to add guilds to your banlist.
The Guild Banlist will supercede all other permissions you have set for that particular house, with one exception: If you wish to give someone in a banned guild access to the house, you must enter that account into your Visitors panel and give that account its permissions there.
Load Permissions is covered under Copying Permissions From Another House in order to avoid monotonous repetition and to save space.
★ Copying Permissions From Another House
The very first time you enter a house you have obtained, you will receive a message box on your screen asking you to set permissions for that house.
At this time you may do so, or you may close the box without doing so and set them later (if you have any to set, that is). You are not required to set permissions upon entry, nor at any time.
If you choose to set permissions right then, you must use the dropdown to select the house from which you wish to copy permissions and then Confirm your selection. This dropdown will only display the names of houses you own. All permissions from the house chosen in the dropdown box will then immediately apply to the one that you are standing in.
If you wish to load permissions from another house at a later date, you may easily do so:
- After loading the panel to View House Permissions, use the assigned keybinding to Load Permissions to the visitor list (listed on the bottom of your screen). The default keybinding is 'F'. A Load Permissions box appears.
- Using the dropdown box, select a house that you own. The house you select will need to have the permissions that you wish to copy to this house.
- When you have made your decision and your selection, use the assigned keybinding to Confirm (default: 'E').
- All permissions will immediately copy from that selected house to the house in which you stand.
★ Changing Permissions You Have Already Set
In the Banlist and Guild Banlist categories, you can click the X beside the account name / guild name in order to remove it from the list.
For the Visitors and Guild Visitors categories, open the category in which you wish to make changes. When you right-click the username on that list, you have two options: Change Permissions [for their permissions in that house] or Remove [from the list for that house].
From there, it is a matter of choosing which option you wish and making any changes you wish to make.
HOUSING ALTERATIONS TOOLS
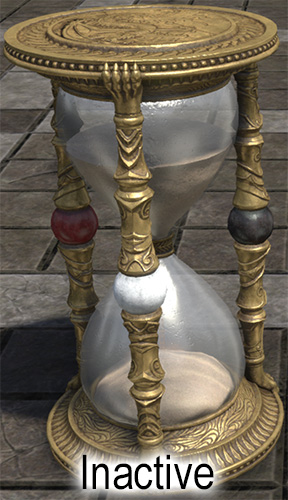
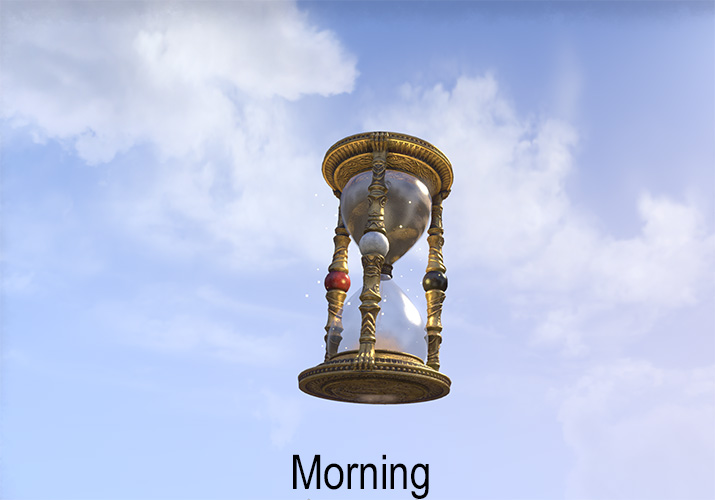
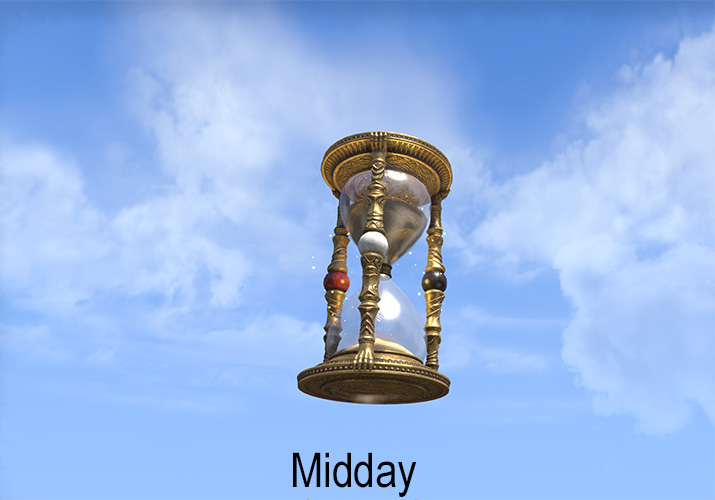
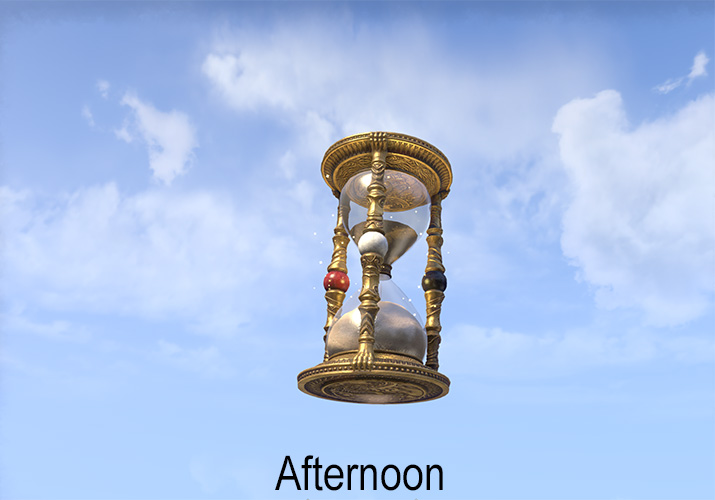
★ Time of Day Control
As not everyone can or wants to use Add-Ons, we are going to focus only on in-game options for altering the time of day in your in-game house.
Currently there are two devices that can alter the time of day:
- Chronometer of the Tribunal - Can be obtained via the Crown Store or from the Master Writ Voucher vendor (Rolis Hlaalu) for 1,000 Master Writ Vouchers.

- Sacred Hourglass of Alkosh - Must use event tickets to obtain from an Impressario's Assistant when it is available; this is a morph of the Soulfire Dragon pet.
You do not have to obtain multiple time of day control devices. You can place one time control in each of your homes at the same time. For example, I can go to the Flaming Nix house and place the Sacred Hourglass of Alkosh furnishing. I can then immediately go to the Moonmirth house and place that same furnishing. It will stay placed in both houses until I remove it from that particular house.
Once you have placed your time of day control furnishing into your house, you can set it to one of six possible settings beyond "Normal Time of Day" aka Inactive:


★ Weather Control
As not everyone can or wants to use Add-Ons, we are going to focus only on in-game options for altering the weather in your in-game house.
Currently there is one device that can alter the time of day:
- Kynareth's Icon of Storm Control - Was only obtainable in May 2025 for completing Golden Pursuits challenges as part of the ESO 10th Anniversary celebration.

You do not have to obtain multiple weather control devices. You can place one weather control in each of your homes at the same time. For example, I can go to the Flaming Nix house and place the Kynareth's Icon of Storm Control furnishing. I can then immediately go to the Moonmirth house and place that same furnishing. It will stay placed in both houses until I remove it from that particular house.
Once you have placed your weather control furnishing into your house, you can set it to one of six possible settings beyond "Normal Weather" aka Inactive:


FURNISHING VAULT

The Furnishing Vault is a special collectible available to ESO+ members introduced with the Update 46 base game patch. It is designed to relieve the stress of having to stow away furniture in houses you have not yet decorated and then later find that furniture.
The Furnishing Vault stores 500 stacks of unique items. Additionally, you can stack up to 1,000 of the exact same item and it will take only one of your 500 slots in your vault. So, if I have 974 Towering Wax Palm Trees, I can place all 974 of them into a single stack in my vault. I now have 499 slots still available to place items into.
If you have ESO+, you can obtain the Furnishing Vault from the Crown Store for free under the Furniture > Storage category.
You cannot obtain the Furnishing Vault if you are using an ESO+ trial.
If you lose your ESO+ you can still retrieve items from the vault but you cannot place more into it until you have ESO+ again.
You do not have to place the Furnishing Vault into your home to use it, but you can place it there if you wish. You will find it under Services in your Housing Editor. You can still access the Vault in any house if you have placed it in a particular house.
You can access your Furnishing Vault in any house you own in Tamriel via the Housing Editor.
The Furnishing Vault has a count of how many slots are filled at the bottom left, a search bar, and several Search categories within:
- Crafting Station
- Target Dummy
- Lighting
- Seating
- Other Furnishings
You cannot place these types of items into the Furnishing Vault:
- Grandmaster Crafting Stations
- Stolen Furnishings
- Furniture Purchased via Gems in the Crown Store
- Furniture Purchased via Crowns in the Crown Store
LINKING HOUSES IN CHATS, WHISPERS, GUILD MOTDS, AND MAILS
★ Link Your House While Inside Your House
You will need to be inside your own house for this to work:
- If you wish to send the link to the chat in your guild or in a whisper, make certain that you first have that person's name set to whisper to, or that guild set to be talked to.
- Use the assigned keybinding to open the Housing Editor (named Show Housing Panel in your list of controls). The default keybind for keyboard and mouse users is 'F5'.
- Press the assigned keybinding to Browse. The default keybind for keyboard and mouse users is 'R'.
- On the left side of your screen a House Information box appears. At the bottom of that box you can see the words, "Link Invite in Chat". Click that link!
- When you click those words, you will see a colored link appear in your chat box prompt where you normally type things to send. It will look like this -- [@Username's House] -- where "@Username" is replaced with your username and "House" is replaced with the name of the house. For example: [@Bob's Cyrodilic Jungle House].
- Simply typing these words into your chat using the same format will not link your house.
- If permissions are not properly on the house so that another can enter it, they will be denied access.
★ Link Your House While Anywhere in the Game
You can be anywhere in the game and still link your house, as long as you are logged onto a character:
- If you wish to send the link to the chat in your guild or in a whisper, make certain that you first have that person's name set to whisper to, or that guild set to be talked to.
- Open your Collections menu using your assigned keybinding.
- Select the Housing tab (the house icon) at the top of the box that appears.
- Scroll through your list of houses under the Collected option until you find the house you wish to link. Select that house.
- The image and information on the right side of the Collections box will change to show you the information for that house.
- On the bottom of your Collections box you can see the words, "Link Invite in Chat". Click that link!
- When you click those words, you will see a link appear in your chat box prompt where you normally type things to send. It will look like this -- [@Username's House] -- where "@Username" is replaced with your username and "House" is replaced with the name of the house. For example: [@Bob's Cyrodilic Jungle House].
- Simply typing these words into your chat using the same format will not link your house.
- If permissions are not set to allow others into the house, those without access that click the link will be denied access.
★ Link Someone Else's House While Inside
You can link someone else's house to others while you are inside it, such as for contests or to show off someone's house to a friend.
The steps for this are identical to Linking Your House While Inside Your House, except that you will use the exact same keybinding to enter Inspection Mode instead of the Housing Editor.
★ House Teleportation Code
There is a special script that ZOS uses to teleport you to a house. This script, when typed into a chat box prompt and sent to the chat, will automatically teleport the user to the house. For some of you, this may be familiar. For others, this may be new.
What this script offers you, though, is the chance to give a link to a house without having to travel to it, even if it is not your own house.
If permissions are not set to allow others into the house, those without access that click the link will be denied access.
The first thing that you will need to do is to gather the following information: @Username, House Name, and House ID.
- The @Username is the easy part. That is the person's account name, which you should already know if you plan to link to their house.
- The House Name is also an easy part. How else can you link to a house if you do not know to which house you wish to link to? Be aware that this is not the nickname someone gives to a house (such as "Bob's Villa") but the official name assigned to it (i.e., Black Vine Villa, The Observatory Prior, Cyrodilic Jungle House, etc.).
- Each house in the game has a unique House ID assigned to it. You will use the name of the house to find it. The good news is, I have those House IDs for you! Check the House List, above, for its proper House ID.
When ready, type the following into your chat box prompt in the game. Everything is case-sensitive and must be spelled correctly. /script JumpToSpecificHouse("@Username", house_ID)
- Substitute the @Username for the username of the individual whose house you are linking to.
- Substitute the words house_ID at the end of that code with the actual House ID.
If you do not know the @Username, you can use the name of the person's character. Remove the @ symbol and type the name of the character between the quotation marks (" "). Everything is case-sensitive and must be spelled correctly.
For example, if I want to link to @Bob's Cyrodilic Jungle House, I would type: /script JumpToSpecificHouse("@Bob", 25). When I press the Enter key on my keyboard, if I have permission to enter the house, I will immediately be teleported to that house.
You can also safely send this script via an in-game mail to another party. Though they will not be able to copy it from the mail and paste it into their chat prompt, they can certainly type it into their chat prompt themselves.
If you send this via an in-game whisper or chat, be absolutely certain to place something in front of that / symbol, followed by a space. Many people use periods, such as . /script blahblah. This prevents you from accidentally teleporting to the house but allows you to send the message.
★ Posting Links to Guild MotDs or In-Game Mails
You may have seen peoples' houses linked in a Guild Message of the Day or in an in-game mail. You can do this also if you are sending a mail or have edit permissions on a Guild MotD!
- If sending the message to a chat or whisper, simply send the message once you have the link in your chat prompt. This can be used with any of the aforementioned methods of linking to a house.
- If sending the message to a Guild MotD or via a mail: Highlight the link in your chat prompt and Copy It (Ctrl+C for PC, Command+C for Mac). Open your mail or edit the Guild MotD and Paste (Ctrl+V for PC, Shift+Command+V for Mac) where you wish the link to appear. You Will Not be able to right-click to Copy or Paste in-game.
BUILDS TO INSPIRE YOU
You can do many things with furnishings in ESO, even using items to make new things you never even thought of.
Inspiration can be taken from many sources, from the simplest of constructions to the most advanced build you have ever laid eyes on. Here you will find images meant to both help and inspire you.
Each image displayed is taken by permission of its creator. Thank you to those willing to allow these image posts for all to see.
Please choose a category you wish to view. As this section grows, more categories and images will be shown:
Buildings, Towns, and Villages