
Monomyth "How To" FAQ
Updated June 06, 2025
Quick Index:
- Armor
- Backpacks and Inventory Capacity
- Fishing
- Potions
- Repairing Metal Armor, Weapons, Blacksmithing Hammers, and Pickaxes
- Spells
- Torches
- Unlocking Items with Keys or Lockpicks
- Weapons
ANCIENT MOTH DUST
Ancient Moth Dust is an item you will find throughout the game. Should you find a pouch of it, do not sell it. Hold onto it!
The moth dust will dispel most blue magical barriers that block your path -- unless the barrier is unlocked by other means, of course. If you do not have any moth dust to dispel the barrier, you cannot pass through it.
ADAMANT PICKAXE
The adamant pickaxe is used to mine the Glowing Crystal in the mines.
Once you enter the mines, you will eventually find an Adamant ore node. Using a pickaxe on this node produces a single Adamant Ore, which is placed into your quest items inventory when you pick it up.
Repair the pickaxe you wish to use in a forge to ensure that it is in top condition.
Make your way to the furnace inside the Lysandrian Factory in the mines. If you need a refresher on how the furnace works, read this quick tutorial!
Open your Inventory window and take the Adamant Ore from your quest items window, placing it into the furnace. Take the Adamant Ingot when it is finished forming.
Make your way to the casting machine.
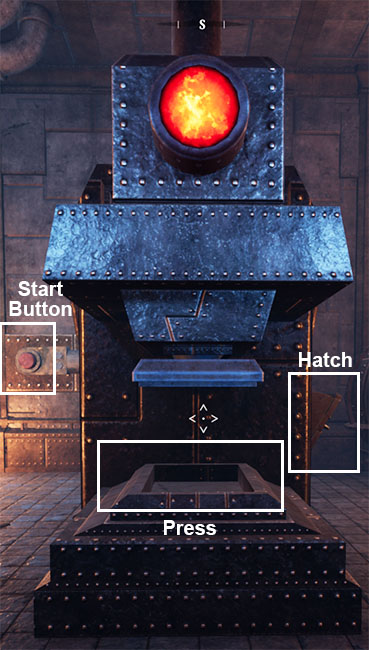
On the right (western) side of the casting machine you will see an open red hatch. Place your Adamant Ingot into it from your quest items inventory and close the hatch (if it does not close on its own).
Open your inventory and choose a pickaxe. Place it on press.
Press the Start button to transform your pickaxe. Take your Adamant Pickaxe when it is done.
ARMOR
To obtain armor, you must stalk your way through the game and find armor either sitting out for you to grab or as loot from a dead body/skeleton.
New armor will auto-equip only if that particular armor slot is empty or if the piece it is replacing is ruined.
BACKPACKS
You can double your inventory capacity one time in the game by equiping a Backpack.
You can only use one backpack at a time.
To equip it, place the backpack in a quickslot. Then Use the quickslot item. When you open your inventory, on the bottom left of the window you will see a "1" and "2" box. Selecting these will switch between your available inventory panels. The number for the inventory window that is active is colored yellow. The inactive window number is colored white.
You can move an item from one inventory window to the other by selecting the item in your inventory and then selecting the "1" or "2" (whichever panel you are not on). Drop the item into the new window and your job is complete.
You can find a backpack in the barracks, inside a locked cell on the first floor. To open the cell, you need the Officer's Key from a gated room on the second floor. To open the gated room on the second floor, you must solve a puzzle in one of the bedrooms on the second floor. Once you have solved it, pressing the red button to the right of the puzzle opens the gate.
BUYING AND SELLING ITEMS
Only certain NPCs will offer you the ability to sell items from your inventory.
Make sure to remove any items you wish to sell from your quickslots. You will not be able to sell items from them.
When you interact with an NPC, there is a gray Trade button on the bottom right. Click that button to sell your items.
If the button is faded/grayed out, you cannot trade with the NPC at that time. You will need to find another NPC to trade with.
If the trader's inventory is full and does not have enough slots to accomodate an item you are selling, the trader will be unable to purchase your sold item. After a period of time the items you sell to a merchant will vanish from the merchant's inventory, freeing up space for you to sell more to them.
If the trader does not have enough coin to purchase the item you are selling, the trader will not purchase the item.
If you are able to haggle, you can use the Consider button to try for a better price.
- In the trade window, the items the NPC has for sale are on the left, and your inventory items are on the right. Drag the item you wish to sell from the top right box into the bottom right box. Closing the trade window will remove any unsold items from the bottom right box.
- If you are purchasing instead of selling, drag the item you wish to buy from the top left box down into the bottom left box. Closing the trade window will remove any unsold items from the bottom right box.
- When you have moved all of the items you wish to sell or buy, click the Trade button to complete the sale.
- You can purchase items at the same time you are trading items; you do not need a separate session for that.
- If you have a backpack equipped, use the Switch button to switch between your first and second inventory panels. This will remove items you have already placed in the "Sell" window and place them back into your inventory. Sell the items you wish to in each panel before switching them.
Pro Tip: Fully repair items (that can actually be repaired) before selling them to receive more coin for them.
Pro Tip: Fully cook items (that can actually be cooked) before selling them to receive more coin for them; some items are worth more fully cooked.
COOKING FOOD
Raw pies, raw fish, and other raw items can be found in the game, just waiting for you to cook it. Why would you bother? Because eating that food returns lost HP (Health Points) to you, of course. Some of these items are not marked as 'raw' in the title, but it will be very clear to you that it is not cooked.
- Locate a fire other than the blacksmithing fire next to the anvil. It may be a small campfire or even an open brick oven with a grate over it.
- Open your Inventory (Default Key: Tab).
- Make sure the food you wish to cook is in your inventory slots and is not in a quickslot.
- Left click on the raw food item to pick it up from your inventory.
- Hover the item to a place beside the fire (if a campfire) or on the grate (if an open brick oven). If the outline of the item is red, you cannot place the food there. If the outline of the item is white, you can place the food there.
- If items are stacked when you place one by the fire, the entire stack will be cooked.
- If you have the audio on, you will hear the food sizzling and cooking. Visually, you can see the item transform in-game. When the item is fully transformed, the food is cooked.
- Pick up the food item from where you placed it. Make sure to stack it if necessary.
EXPLODING BARRELS
Thoughout the game you will find red-colored barrels that have a fuse coming out of the top. You can use these barrels to blow open wooden doors and barriers. There are two ways to light this barrel:
The Torch Method: Place your barrel where you want it to go boom. Put a torch into your shield slot and have it as the active 'shield.' Crouch down (Default Key: Ctrl) in front of the barrel. Use the torch to light the fuse (Default Key: X). Get out of the way immediately because it will blow you up, too. This is, clearly, the most dangerous of the two methods.
The Ignite Spell Method: There is a Cosmic spell called Ignite that lets you ignite small inanimate objects. Equip the Ignite spell from your spell book and then stand as far back as you can. Use the spell on the barrel to make it go boom. Problem solved!
FISHING
In this game, food regenerates your Hit Points. You can find a variety of food in the game, including fish. With the abundance of water, you can also go fishing to catch some dinner, though it is not a requirement.
You will encounter a river with a fishing rod nearby early in the game, and on at least one other occasion. Though it takes up much of your inventory space, having a fishing rod on hand can be useful in a pinch.
In order to fish, complete the following steps:
- Open your Inventory (Default Key: Tab).
- Equip the rod into a weapon slot, which will take up both a weapon and shield slot. You have two weapon slots and two shield slots. If you need to switch between a weapon and the fishing rod, you can use the default R key to do so.
- Exit your inventory and left click to cast.
- When a fish has bitten, the red and white bobbin will completely disappear beneath the surface of the water. Left click to reel the fish in.
- You cannot quickslot this item.
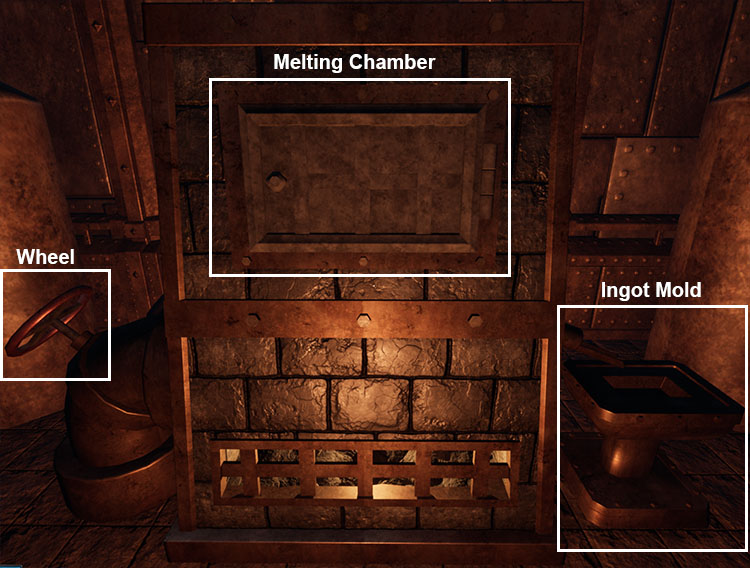
FURNACE USAGE
Located within the Lysandrian Factory northeast of where you find Erwan and the merchant Aidan, the furnace is used to smelt all of that ore you have been collecting into ingots.
You initialy find a Ragged Scroll near the gate to the furnace informing you of how to use the furnace, but sometimes we misplace things... Hence this little tutorial!
- Open the gray rectangular door on the front of the furnace near the top. This is the melting chamber.
- Open your Inventory (Default Key: Tab).
- Select a piece of ore. If you wish to split off a single piece, hold down the Shift key and single-left-click the ore; enter the number of how many you wish to take and click the Take button. Place your selected ore into the melting chamber. You will receive a gear icon when you can place it inside. Do not place different types of ore into the melting chamber at the same time.
- Close your Inventory window and also the door of the melting chamber. You will not be able to melt the ore without closing the melting chamber.
- Select the wheel on the left side of the furnace to turn it. Do this only once. This will cause the furnace to make a noise at you.
- On the right side of the furnace liquid metal will spill out into an ingot mold. When the liquid is no longer red-hot, take your new ingot.
INVENTORY MANAGEMENT TIPS
Too many items and not enough inventory slots! This is a common problem many of us gamers know all too well, but especially those of us who were gaming long before all of these pretty games with fancy graphics came out.
Utilize Your Quickslots: A little trick I like to use when my inventory is too full, is to equip an item in my quickslots if they are not full. I generally choose items that take up many slots in my inventory. The more slots I can free up, after all, means more things I can pick up and sell off. As a side note, make certain to remove the item from your quickslot when you have enough empty slots to do so. You cannot sell an item directly from your quickslots -- it must be in your inventory.
Cook Food Often: In addition to cooked food, you can also find raw food in the game that needs to be cooked before it can be eaten. As the raw food will not stack with the cooked food, it is always a good idea to cook your food as soon as you can and then stack it on the cooked food version if necessary.
Sell Often: Every time you pass an NPC at which you can trade, if you have things to get rid of, Sell, Sell, Sell, even if it is just one item. Not doing so may cause you to regret it when you find your inventory full of valuable loot and you really want that weapon on the ground you cannot pick up.
Stack Often: If you have an item in your quickslots and pick up an identical item from the ground, it may not add itself automatically to the items in your quickslots. Items in your quickslots will not appear in your inventory. So if you have an identical item sitting in both, you will want to drag and drop the item from your inventory over top of the assigned quickslot. The item count on your quickslot will increase and you will regain inventory space. You cannot stack things such as shields, armor, and weapons.
MANDRAKE ROOT
You are finding light charcoal and torches all over the place, but how do you light it?
Thankfully, the only thing you need to light a torch is the torch itself!
Place the torch into a shield slot. You have two weapon slots and two shield slots. If you need to switch between a weapon and a torch, you can use the default R key to do so.
PICKAXES / MINING
You must locate a pickaxe before you can obtain ore. Once you have located it, place the pickaxe into your Weapon slot via your inventory window.
When you find a sparkly Ore Node, set your pickaxe to your weapon and use it against the ore node. You do not need to have invested in piercing weapons to use this tool effectively against nodes. The node will crack open to reveal a piece of ore for you to pick up.
If you wish further information on the Adamant Pickaxe, See the Information on Adamant Pickaxe above.
POTIONS
The potions in the game are rarely marked. Even then, what they do is vague. So, here is a nice little 'what is that?' list for you.
- Azram's Oil: Breathable air
- Blue Potion: Restore a lot of Mana. Alternatively, it can turn out to be water.
- Fireberry Potion: A potion that delivers an explosion when it hits its target.
- Featherfall Potion: Reduce the weight of its user for a short time
- Invisibility Potion: Makes you invisible for a short time, but you can still be heard
- Red Potion: Restore a lot of Health
Though these are not potions, they affect things other than health:
- King's Herb: Restore a little health, but there is a chance it makes you sick. If you are desperate, however...
- Mushroom: Restore a little mana
- Queen's Leaf: Cure poison
- Strange Egg: Speed boost
Making Blue Potions: Sometimes you will find empty flasks. If you wish to make more blue mana potions, you can head to a water source bathed in blue light. Open your inventory and combine the empty flask with the water. You have a chance to receive a mana potion.
Making Red Potions: Sometimes you will find empty flasks. If you wish to make more red health potions, you can head to a water source bathed in red light. Open your inventory and combine the empty flask with the water. You have a chance to receive a health potion.
Note: If you reach level 10 in your arcane skill, you will never again need a mushroom or mana potion to restore your mana if you use a spell from that Arcane school.
REPAIRING METAL ARMOR, METAL WEAPONS, BLACKSMITHING HAMMERS, AND PICKAXES
Note: This will not work on cloth, wood, or bone materials. Only metal or certain metal components.
When your armor or weapons break in the game, you lose them. Permanently. This is why it is always a good idea to repair your armor and weapons often, sometimes even going back a little ways if necessary to repair it.
In fact, if you see a yellow armor or weapon icon on the bottom left of your screen, this means that it will break soon. Go repair it if you run into this situation.
To repair your armor/weapon, you first need to locate an anvil. The anvil is rather large and very hard to miss unless you are blazing through rooms and not paying attention. Side note: Always pay attention in this game.
Within the same room as the anvil, you will also find a forge hammer. You will need this to repair your gear.
Finally, you also need to locate the glowing fire contained within a barrel of stone that has tongs sticking out of it. This is always in the same room as an anvil, and usually very close by.
Once you have what you need, it is time to start repairing:
- If you do not have the game sound turned on, you should do so for only as long as it takes to repair your items. For those with hearing impairments, I offer you a solution in the steps below.
- Open your Inventory (Default Key: Tab).
- Locate the metal piece of armor or weapon you want to repair. Left click the item to pick it up and left click again with the item hovering over top of the fire barrel to place it inside. You can place multiple items inside, as long as they are not too large.
- You only need to leave the piece in the fire for a few seconds. With your inventory still open, take the item from the fire and place it onto the anvil. The item will be outlined in white if you can place it, and red if you cannot.
- Place your forge hammer into your weapon slot. Then exit your inventory using the Interact key (Default Key: F).
- 'Attack' the glowing metal of your armor/weapon with the hammer until it stops glowing and also makes a different clanging noise. For those with hearing impairments, the item is usually finished being repaired two hits after it stops glowing.
- If you are repairing multiple pieces, you will need to repair each item separately.
- Your armor piece or weapon is now repaired and is safe to wear for a while.
You can confirm that you completed repairs by hovering your mouse over the item in your inventory and looking at its stats. If the quality is listed as Excellent, it is repaired as best as it can be.
SHOVELS / DIGGING
Shovels are used in the game to dig up treasure, in conjunction with the Search ability.
You will also need a shovel to complete a quest in the Lysandria Heartlands called A Tormented Soul.
To find your first shovel:
- Go to the Temple of Rahi in the Lysandria Heartlands and stand in the room with Father Morris.
- Exit the Door in the Southwest corner.
- In the corridor outside, turn to your right (facing West) and walk to the end of the hallway. Ignore the stairs to the north.
- Turn to your left to face South and move forward. Continue down the set of stairs in this corridor and exit to find yourself facing West.
- In front of you, you will see a grave and a bridge. Directly before you reach the bridge, to your left (facing Southwest), is a ladder.
- Climb down the ladder.
- On the rocks below, turn to face Northwest and walk to under the Bridge above you. You will see a Doorway to your right, facing Northeast.
- Enter the Northeastern Doorway to find a Shovel propped up against the front of a Wagon.
SPELLS
Obtaining Spells: There are two ways in which you can obtain a spell in the game:
- Stalk your way through the game and find spell scrolls sitting around just waiting for you to pick them up. You will learn the spell the moment you pick it up.
- Discover spells by experimenting with echo stone patterns. You will not be able to discover a new spell if your stats are not high enough, however.
Viewing Spells and Echo Stones: To check out your spells, you need to open your Inventory (Default Key: Tab):
- Select the pentagram symbol at the top right of your screen, above your inventory information.
- On the bottom right of your screen is a gray button that reads either "Spellbook" or "Echo Stones."
- Select Spellbook to go to your spellbook, and select Echo Stones to view your echo stones.
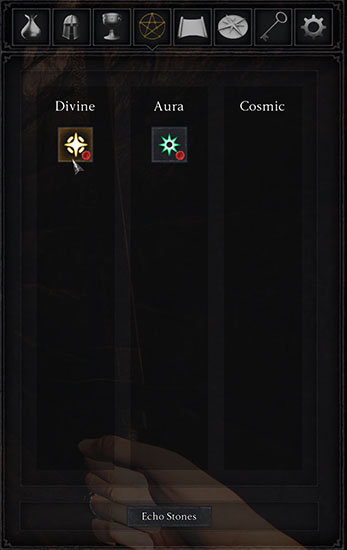
- Go to your Spellbook section. There, you will see several columns. Spells that you have picked up will be represented by icons in each of the categories.
- Spells that are equiped will have a red dot on the bottom right corner of their icon.
- Hover over an icon to receive a box on the left that tells you what requirements are needed to cast the spell. Choose a spell from your spell list that you meet the requirements for.
- For the spell you choose, on the left you will see an image of the pentagram with red lines on it. You will also notice that one end of the red line wanders off of the path of the pentagram. These red lines represent lines between activated Echo Stones (which will be explained momentarily). I have marked the Echo Stone points of these lines with a "1" and a "2". It is at "2" where the line wanders, as if in a half-arrowpoint.

- Make a note of the red lines on the pentagram, as you will need to know that pattern in just a moment.
- Now you need to memorize your spell. Recall the red lines that were on the pentagram image of the spell you wanted to memorize.
- Recall also that random red line 'tail' that wandered off of the path of the pentagram. For this example, we will use the image above.
- Select the filled-in Echo Stones points to learn your spell, starting with the end where there was no 'tail' and ending with the end where there was the 'tail'. In the image above, the 1 was the start, and the 2 was the finish, as the 2 is where the 'tail' is. Be certain to select Stones points in a way that the line is continuous and does not skip points along the way.
- If you selected the correct pattern, a symbol appears in the center of your Echo Stones diagram. Hovering over it will inform you of what spell is currently memorized.
- Doing this before choosing your echo stones for the new spell is simple. Just select the spell you want to remove to make its symbol fade and a plus sign appear over it. This will become the spell that you replace.
- Alternatively, you can select your echo stones for the new spell first and then replace an existing spell. To replace it, just select the symbol of the spell you wish to replace after you have set the stones for the new spell. Its icon will chance to the new spell icon, it will become faded, and it will have a plus symbol over it.
- Select the filled-in Echo Stones points to learn your spell, starting with the end where there was no 'tail' and ending with the end where there was the 'tail'. In the image above, the 1 was the start, and the 2 was the finish, as the 2 is where the 'tail' is. Be certain to select Stones points in a way that the line is continuous and does not skip points along the way.
- If you selected the correct pattern, a symbol appears in the center of your Echo Stones diagram. Hovering over it will inform you of what spell is currently memorized.
Equiping Spells: When you picked up your Arcane Tome, you should also have picked up three Echo Stones in the same room: Aris, Isil, and Vektra, which are automatically equipped. Every time you pick up a new Echo Stone, it is automatically equipped. Before you can cast spells, you need to memorize them. Before you can memorize them, you need to know their requirements.
Go to your Echo Stones book.
Here, you can see which Echo Stones you have picked up. Inside the large pentagram drawing, the bubbles that are filled in are Stones you have picked up. You can hover over them to see what they are.
Once you have successfully memorized a brand new spell, you will receive a notification if you have not memorized it previously.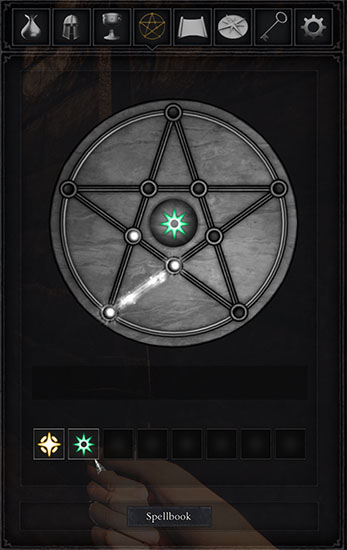
Below the echo stones diagram are empty boxes containing symbols for which spells you have equipped. If you have an empty box before memorizing the spell, a faded symbol for it will appear in the empty box with a plus symbol over it. Select the Plus sign to make the spell active.
If you do not have an empty spell box, you must choose a spell you already have equipped to replace.
Selecting its icon will make the symbol fade and a plus sign will appear over it. If you have already selected the echo stones for the new spell, the icon will change to the new spell icon. Selecting the plus sign on an old spell will remove the spell, while selecting the plus sign on the new spell will set it as active.
You may only memorize as many spells as you have slots. You may notice that some of your spell slots are blackened out. You will not be able to learn spells in those slots until they are unlocked by increasing your xxxx stat.
If you would like to replace one spell with another, you can select its icon from the Echo Stones book. This will activate a gray Plus symbol over it. Clicking the box again will cancel the action. With the plus symbol over the icon, you may then memorize your new spell, which will replace the old one.
You can also use the Echo Stones book to learn new spells that you have not yet picked up, as long as your Intelligence score is high enough and you have the Echo Stones necessary! All you have to do is to try selecting different points in different orders. Here are some of the ones I have found!
SUN TRAPS
Those fireball throwing sun traps! Argh! You keep dying to them! But, wait! There is a solution! The cosmic school spell called Ignite or the divine school spell called Lesser Lightning.
Arm yourself with the Ignite or Lesser Lightning spell, get really close to that trap (Yes, practically right next to it), and put the smack down on that rude sun that keeps hurting you. Problem solved!
Be prepared to get smacked in the face with a fireball while you are trying, though. You will not be able to destroy the trap unless it is active (as indicated by glowing eyes)
TORCHES
You are finding lit charcoal and torches all over the place, but how do you light the torch?
Thankfully, the only thing you need to light a torch is the torch itself!
Place the torch into a shield slot and then set that to the 'active shield'. You have two weapon slots and two shield slots. If you need to switch between a weapon and a torch, you can use the default R key to do so.
As a side note, you can wield a weapon with one hand and hold a torch with the other. Unfortunately, you will have no shield to stop your enemy's blows if you use this method.
UNLOCKING ITEMS WITH KEYS AND LOCKPICKS
Before you can unlock things (a door, chest, etc.), you will need to find either a key or a set of lockpicks, both of which are found scattered throughout the game.
Certain doors will only accept keys, some can be unlocked with either a key or a lockpick, and others require only lockpicks to use. They are not marked.
If an item only requires a key, and you happen to have picked up the key already, trying to open the object automatically unlocks it.
If a lockpick can be used, there are things you need to do:
- Obtain a lockpick kit. Once you have it, you can use it either by placing it into a quickslot or by leaving it in your inventory.
- If you already have a lockpick in a quickslot, you can use it on a locked item by facing the item and pressing the quickslot key number (1 - 4) assigned to your lockpicks. The lockpick kit icon will appear on screen, and you can left-click with it over the object to unlock it.
- Alternatively, you can open your inventory and left click to select the lockpick kit. Hover the kit over the item you wish to unlock and left click to unlock the item.
If the lock is too difficult for you, you will be informed when you try to use a lockpick. You will not lose any lockpicks.
Successful lockpicking an item will consume a lockpick.
WEAPONS
You must stalk your way through the game and find weapons either sitting out for you to grab or next to a dead body/skeleton.
New weapons will auto-equip only if that particular weapon slot is empty.